 nodejs-backend-architecture-typescript
Node.js Backend Architecture Typescript - Learn to build a backend server for production ready blogging platform like Medium and FreeCodeCamp. Main Features: Role based, Express.js, Mongoose, Redis, Mongodb, Joi, Docker, JWT, Unit Tests, Integration Tests.
Quick Overview
Error generating quick overview
Convert  designs to code with AI

Introducing Visual Copilot: A new AI model to turn Figma designs to high quality code using your components.
Try Visual CopilotREADME
Node.js Backend Architecture Typescript Project
A complete project to build a blogging platform like Medium, and FreeCodeCamp
![]()
Note: This is the latest (version 2) of the project. If you are using version 1 then checkout the branch version-1
Project Highlights
- Node.js
- Express.js
- Typescript
- Mongoose
- Redis
- Mongodb
- Joi
- Unit Tests & Integration Tests
- Docker
- JWT
About The Project
This project is designed for a production ready environment. It can handle the scale and complexity of a very demanding application. This project is being used by companies like MindOrks, AfterAcademy, and CuriousJr. Apps/Websites having 10+ million usebase.
It is suitable for Web Apps, Mobile Apps, and other API services.
About The Author
You can connect with us here:
Project Instructions
We will learn and build the backend application for a blogging platform. The main focus will be to create a maintainable and highly testable architecture.
Following are the features of this project:
- This backend is written in Typescript: The type safety at build time and having intellisense for it in the IDE like vscode is unparalleled to productivity. I have found production bug reduced to a significant amount since most of the code vulnerabilities are identified during the build phase itself.
- Separation of concern principle: Each component has been given a particular role. The role of the components is mutually exclusive. This makes the project easy to be unit tested.
- Feature encapsulation: The files or components that are related to a particular feature have been grouped unless those components are required in multiple features. This enhances the ability to share code across projects.
- Centralised Error handling: I have created a framework where all the errors are handled centrally. This reduces the ambiguity in the development when the project grows larger.
- Centralised Response handling: Similar to Error handling we have a response handling framework. This makes it very convenient to apply a common API response pattern.
- Mongodb is used through Mongoose: Mongodb fits very well to the node.js application. Being NoSQL, fast, and scalable makes it ideal for modern web applications.
- Redis Memcache: I have used the redis server for caching the items which does not change frequently. It will boost the performance of our system.
- Async execution: I have used async/await for the promises and made sure to use the non-blocking version of all the functions with few exceptions.
- Docker compose has been configured: I have created the Dockerfile to provide the easy deployability without any setup and configurations.
- Unit test is favored: The tests have been written to test the functions and routes without the need of the database server. Integration tests has also been done but the unit test is favored.
- A pure backend project: I have experienced that when a backend is developed clubbed with a frontend then in the future it becomes really difficult to scale. We would want to create a separate backend project that servers many websites and mobile apps.
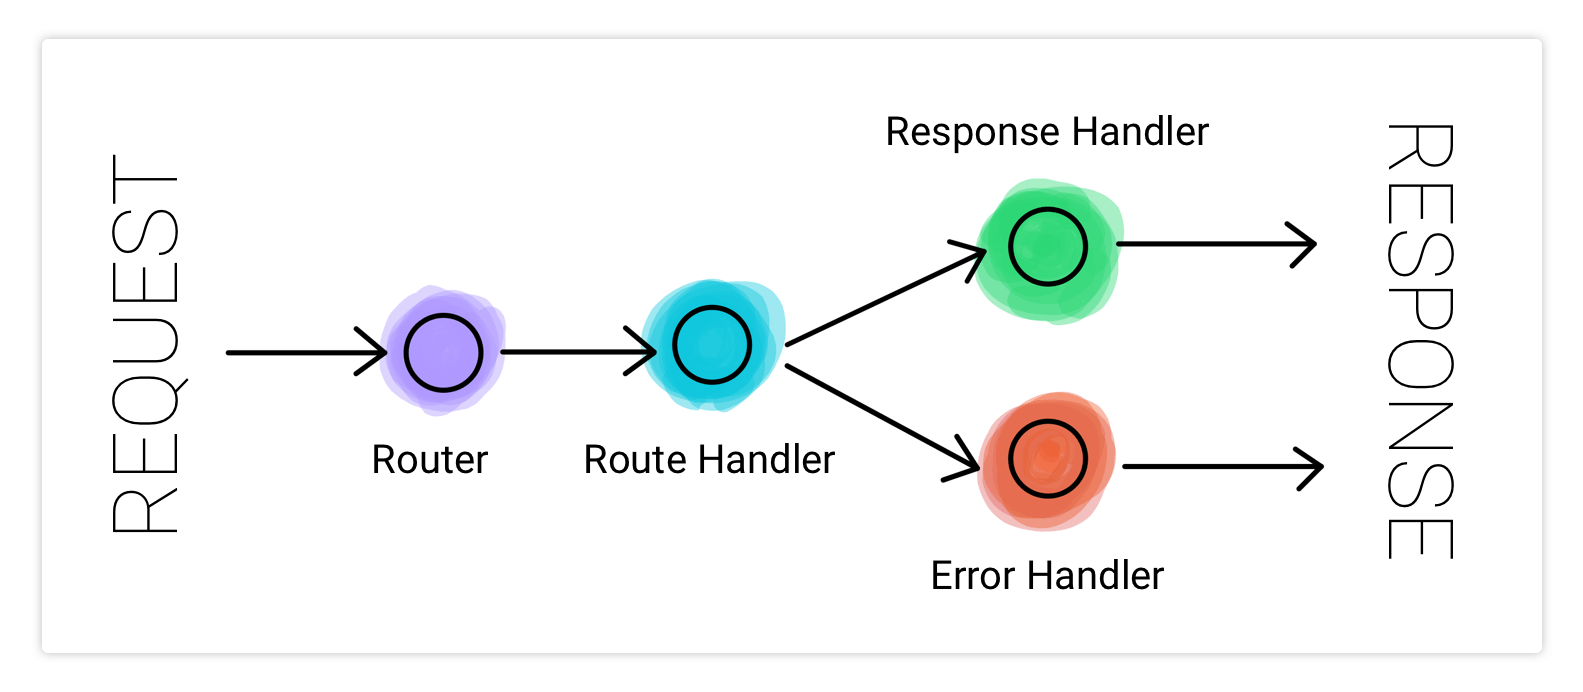
3RE Architecture: Router, RouteHandler, ResponseHandler, ErrorHandler
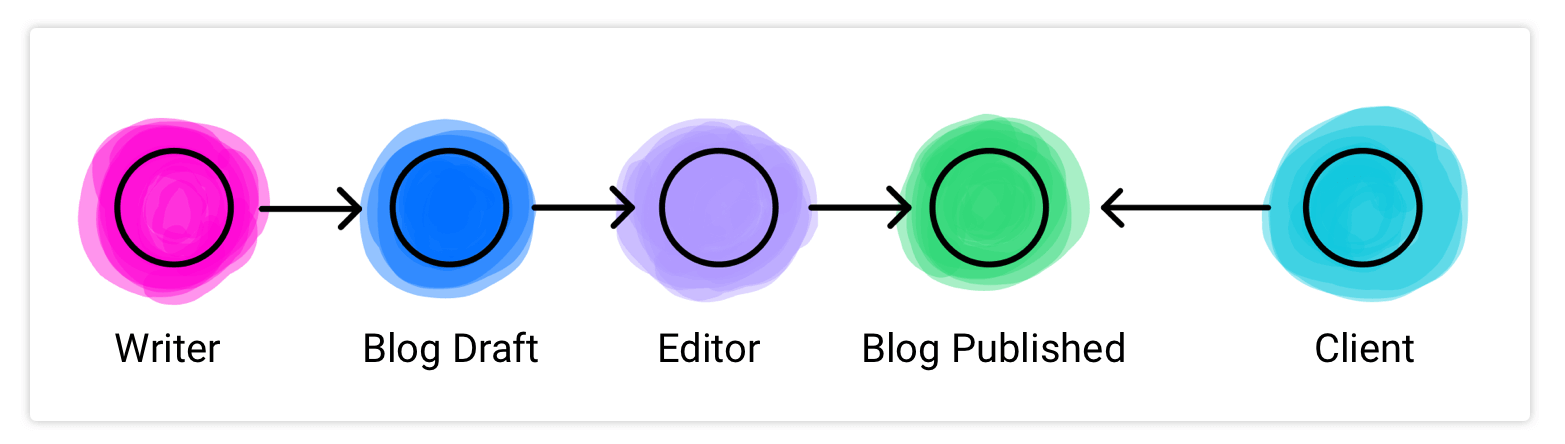
Project Outline: Blogging Platform
Request-Response Handling Schematic Diagram
Learn the concepts used in this project
- Design Node.js Backend Architecture like a Pro
- The video guide to build and run this project
- Implement JSON Web Token (JWT) Authentication using AccessToken and RefreshToken
- TypeScript Tutorial For Beginners
- From JavaScript to TypeScript
How to build and run this project
vscode is the recommended editor - dark theme
Get the repo
# clone repository recursively
git clone https://github.com/afteracademy/nodejs-backend-architecture-typescript.git
Run Docker Compose
- Install Docker and Docker Compose. Find Instructions Here.
# install and start docker containers
docker-compose up --build
- You will be able to access the api from http://localhost:3000
Run Tests
docker exec -t blogs-tester npm run test
If having any issue
- Make sure 3000 port is not occupied else change PORT in .env file.
- Make sure 27017 port is not occupied else change DB_PORT in .env file.
- Make sure 6379 port is not occupied else change REDIS_PORT in .env file.
Run on the local machine
Change the following hosts in the .env and .env.test
- DB_HOST=localhost
- REDIS_HOST=localhost
Best way to run this project is to use the vscode Run and Debug button. Scripts are available for debugging and template generation on vscode.
- Install node.js and npm on your local machine.
# From the root of the project executes
$ npm install
Stop the app and tester docker container
$ docker compose stop tester
$ docker compose stop app
Run the app
# production mode
$ npm start
or
# watch mode
$ npm run watch
Test
# unit and integration tests
$ npm test
API DOC
Learn Backend Development From Our Videos
- Introduction to Web Backend Development for Beginners
- Backend System Design for Startups
- Practical Javascript for Beginners
Project Directory Structure
âââ .vscode
â âââ settings.json
â âââ tasks.json
â âââ launch.json
âââ .templates
âââ src
â âââ server.ts
â âââ app.ts
â âââ config.ts
â âââ auth
â â âââ apikey.ts
â â âââ authUtils.ts
â â âââ authentication.ts
â â âââ authorization.ts
â â âââ schema.ts
â âââ core
â â âââ ApiError.ts
â â âââ ApiResponse.ts
â â âââ JWT.ts
â â âââ Logger.ts
â â âââ utils.ts
â âââ cache
â â  âââ index.ts
â â  âââ keys.ts
â â  âââ query.ts
â â  âââ repository
â â  âââ BlogCache.ts
â â  âââ BlogsCache.ts
â âââ database
â â âââ index.ts
â â âââ model
â â â âââ ApiKey.ts
â â â âââ Blog.ts
â â â âââ Keystore.ts
â â â âââ Role.ts
â â â âââ User.ts
â â âââ repository
â â âââ ApiKeyRepo.ts
â â âââ BlogRepo.ts
â â âââ KeystoreRepo.ts
â â âââ RoleRepo.ts
â â âââ UserRepo.ts
â âââ helpers
â â âââ asyncHandler.ts
â â âââ permission.ts
â â âââ role.ts
â â âââ security.ts
â â âââ utils.ts
â â âââ validator.ts
â âââ routes
â â âââ access
â â â âââ credential.ts
â â â âââ login.ts
â â â âââ logout.ts
â â â âââ schema.ts
â â â âââ signup.ts
â â â âââ token.ts
â â â âââ utils.ts
â â âââ blog
â â â âââ editor.ts
â â â âââ index.ts
â â â âââ schema.ts
â â â âââ writer.ts
â â  âââ blogs
â â  â  âââ index.ts
â â  â  âââ schema.ts
â â âââ index.ts
â â âââ profile
â â âââ schema.ts
â â âââ user.ts
â âââ types
â âââ app-request.d.ts
âââ tests
â âââ auth
â â âââ apikey
â â â âââ mock.ts
â â â âââ unit.test.ts
â â âââ authUtils
â â â âââ mock.ts
â â â âââ unit.test.ts
â â âââ authentication
â â â âââ mock.ts
â â â âââ unit.test.ts
â â âââ authorization
â â âââ mock.ts
â â âââ unit.test.ts
â âââ core
â â âââ jwt
â â âââ mock.ts
â â âââ unit.test.ts
â âââ cache
â â âââ mock.ts
â âââ database
â â âââ mock.ts
â âââ routes
â â âââ access
â â â âââ login
â â â â âââ integration.test.ts
â â â â âââ mock.ts
â â â â âââ unit.test.ts
â â â âââ signup
â â â âââ mock.ts
â â â âââ unit.test.ts
â â âââ blog
â â âââ index
â â â âââ mock.ts
â â â âââ unit.test.ts
â â âââ writer
â â âââ mock.ts
â â âââ unit.test.ts
â âââ setup.ts
âââ addons
â âââ init-mongo.js
âââ keys
â âââ private.pem
â âââ public.pem
âââ .env
âââ .env.test
âââ .gitignore
âââ .dockerignore
âââ .eslintrc
âââ .eslintignore
âââ .prettierrc
âââ .prettierignore
âââ .travis.yml
âââ Dockerfile
âââ docker-compose.yml
âââ package-lock.json
âââ package.json
âââ jest.config.js
âââ tsconfig.json
Directory Traversal for Signup API call
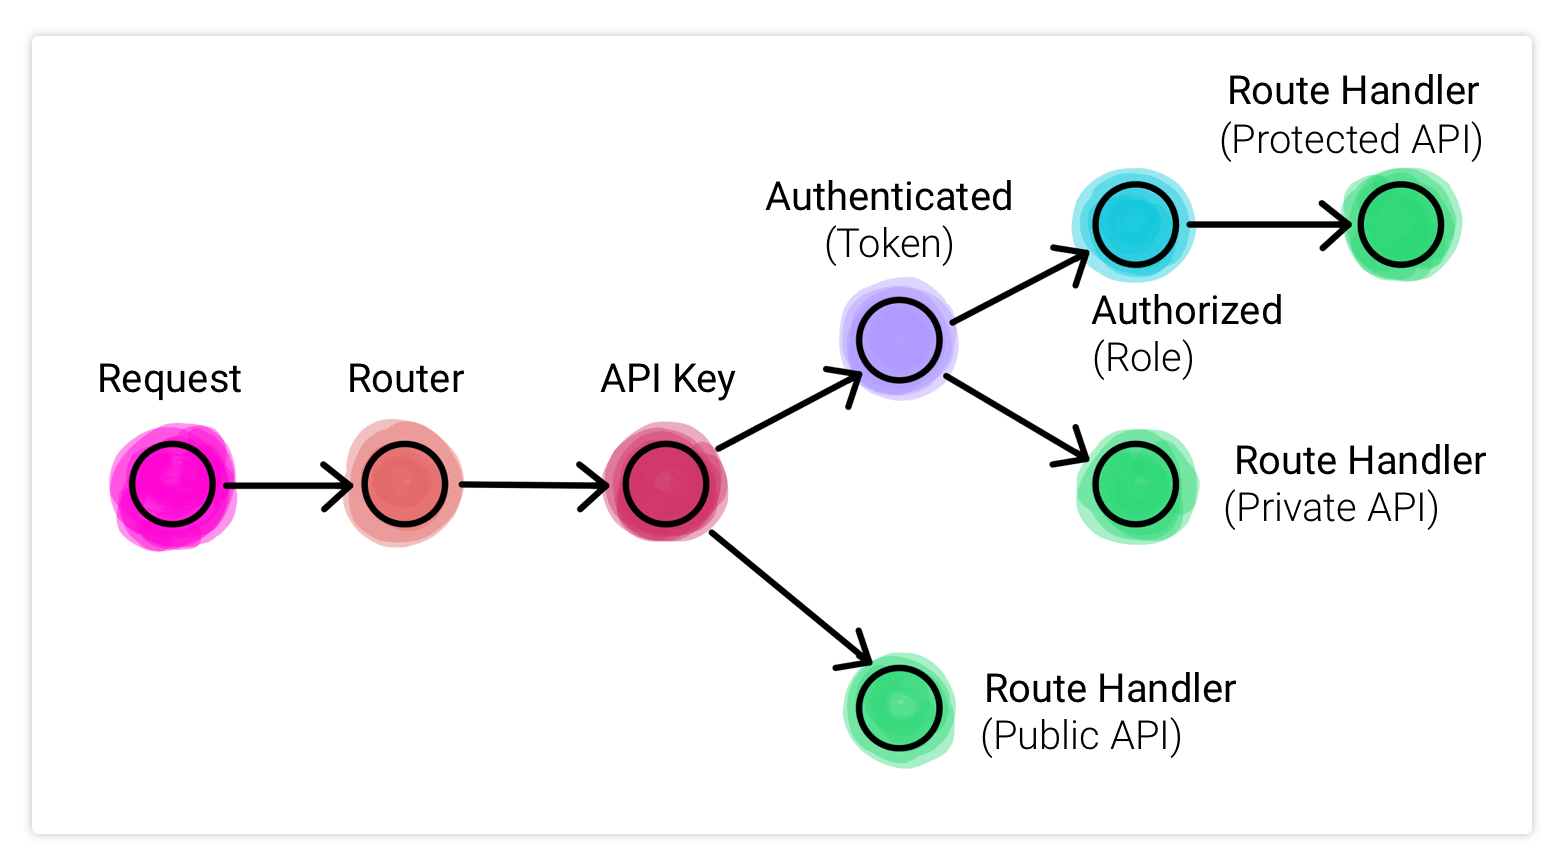
/src â server.ts â app.ts â /routes/index.ts â /auth/apikey.ts â schema.ts â /helpers/validator.ts â asyncHandler.ts â /routes/access/signup.ts â schema.ts â /helpers/validator.ts â asyncHandler.ts â /database/repository/UserRepo.ts â /database/model/User.ts â /core/ApiResponses.ts
API Examples
- Signup
- Method and Headers
POST /signup/basic HTTP/1.1 Host: localhost:3000 x-api-key: GCMUDiuY5a7WvyUNt9n3QztToSHzK7Uj Content-Type: application/json- Request Body
{ "name" : "Janishar Ali", "email": "ali@github.com", "password": "changeit", "profilePicUrl": "https://avatars1.githubusercontent.com/u/11065002?s=460&u=1e8e42bda7e6f579a2b216767b2ed986619bbf78&v=4" }- Response Body: 200
{ "statusCode": "10000", "message": "Signup Successful", "data": { "user": { "_id": "63a19e5ba2730d1599d46c0b", "name": "Janishar Ali", "roles": [ { "_id": "63a197b39e07f859826e6626", "code": "LEARNER", "status": true } ], "profilePicUrl": "https://avatars1.githubusercontent.com/u/11065002?s=460&u=1e8e42bda7e6f579a2b216767b2ed986619bbf78&v=4" }, "tokens": { "accessToken": "some_token", "refreshToken": "some_token" } } }- Response Body: 400
{ "statusCode": "10001", "message": "Bad Parameters" } - Profile Private
- Method and Headers
GET /profile/my HTTP/1.1 Host: localhost:3000 x-api-key: GCMUDiuY5a7WvyUNt9n3QztToSHzK7Uj Content-Type: application/json Authorization: Bearer <your_token_received_from_signup_or_login>- Response Body: 200
{
  "statusCode": "10000",
  "message": "success",
  "data": {
    "name": "Janishar Ali Anwar",
    "profilePicUrl": "https://avatars1.githubusercontent.com/u/11065002?s=460&u=1e8e42bda7e6f579a2b216767b2ed986619bbf78&v=4",
    "roles": [
      {
        "_id": "5e7b8acad7aded2407e078d7",
        "code": "LEARNER"
      },
      {
        "_id": "5e7b8c22d347fc2407c564a6",
        "code": "WRITER"
      },
      {
        "_id": "5e7b8c2ad347fc2407c564a7",
        "code": "EDITOR"
      }
    ]
  }
}
Find this project useful ? :heart:
- Support it by clicking the :star: button on the upper right of this page. :v:
License
   Copyright (C) 2026 MINDORKS NEXTGEN PRIVATE LIMITED

   Licensed under the Apache License, Version 2.0 (the "License");
   you may not use this file except in compliance with the License.
   You may obtain a copy of the License at

       http://www.apache.org/licenses/LICENSE-2.0

   Unless required by applicable law or agreed to in writing, software
   distributed under the License is distributed on an "AS IS" BASIS,
   WITHOUT WARRANTIES OR CONDITIONS OF ANY KIND, either express or implied.
   See the License for the specific language governing permissions and
   limitations under the License.
Convert designs to code with AI
Introducing Visual Copilot: A new AI model to turn Figma designs to high quality code using your components.
Try Visual Copilot