 wifi_ducky
Upload, save and run keystroke injection payloads with an ESP8266 + ATMEGA32U4
Top Related Projects

USBdriveby exploits the trust of USB devices by emulating an HID keyboard and mouse, installing a cross-platform firewall-evading backdoor, and rerouting DNS within seconds of plugging it in.

P4wnP1 A.L.O.A. by MaMe82 is a framework which turns a Rapsberry Pi Zero W into a flexible, low-cost platform for pentesting, red teaming and physical engagements ... or into "A Little Offensive Appliance".

WiFi HID Injector - An USB Rubberducky / BadUSB On Steroids.
P4wnP1 is a highly customizable USB attack platform, based on a low cost Raspberry Pi Zero or Raspberry Pi Zero W.

The legacy Exploit Database repository - New repo located at https://gitlab.com/exploit-database/exploitdb
Quick Overview
The wifi_ducky project is a Wi-Fi controlled USB Rubber Ducky. It combines an ESP8266 Wi-Fi module with an ATmega32U4 microcontroller to create a device that can be remotely controlled to execute keyboard commands on a target computer. This project allows for wireless deployment of keystroke injection attacks or automation scripts.
Pros
- Remote control: Allows for wireless execution of keyboard commands
- Customizable: Can be programmed with various scripts for different purposes
- Cost-effective: Uses relatively inexpensive and readily available components
- Open-source: Provides full access to the code and hardware designs
Cons
- Potential for misuse: Could be used for malicious purposes if not handled responsibly
- Limited range: Wi-Fi connectivity may be restricted by distance and obstacles
- Requires technical knowledge: Assembly and programming require some expertise
- May be detected by security software: Some antivirus programs might flag the device
Code Examples
// Example 1: Connecting to Wi-Fi
#include <ESP8266WiFi.h>

const char* ssid = "YourWiFiSSID";
const char* password = "YourWiFiPassword";

void setup() {
  WiFi.begin(ssid, password);
  while (WiFi.status() != WL_CONNECTED) {
    delay(500);
  }
}
// Example 2: Sending keystrokes
#include <Keyboard.h>

void setup() {
  Keyboard.begin();
}

void loop() {
  Keyboard.print("Hello, World!");
  delay(1000);
}
// Example 3: Handling incoming commands
#include <ESP8266WebServer.h>

ESP8266WebServer server(80);

void handleCommand() {
  String command = server.arg("cmd");
  // Process the command
  server.send(200, "text/plain", "Command received");
}

void setup() {
  server.on("/cmd", handleCommand);
  server.begin();
}
Getting Started
- Clone the repository:
git clone https://github.com/spacehuhn/wifi_ducky.git - Install the required libraries: ESP8266WiFi, ESP8266WebServer, Keyboard
- Upload the ESP8266 code to the Wi-Fi module
- Upload the ATmega32U4 code to the microcontroller
- Connect the hardware components according to the provided schematics
- Power on the device and connect to its Wi-Fi network
- Access the web interface to send commands or upload scripts
Competitor Comparisons
USBdriveby exploits the trust of USB devices by emulating an HID keyboard and mouse, installing a cross-platform firewall-evading backdoor, and rerouting DNS within seconds of plugging it in.
Pros of usbdriveby
- More versatile, targeting multiple operating systems (Windows, macOS, Linux)
- Includes additional features like DNS spoofing and network reconfiguration
- Offers more advanced payload options and customization
Cons of usbdriveby
- More complex setup and configuration required
- Less focused on specific Wi-Fi attacks compared to wifi_ducky
- May require more technical knowledge to use effectively
Code Comparison
wifi_ducky example:
#include <Keyboard.h>
void setup() {
  Keyboard.begin();
  delay(1000);
  Keyboard.print("Hello, World!");
  Keyboard.end();
}
usbdriveby example:
import usb_hid
from adafruit_hid.keyboard import Keyboard
from adafruit_hid.keycode import Keycode

kbd = Keyboard(usb_hid.devices)
kbd.send(Keycode.WINDOWS, Keycode.R)
kbd.type("cmd\n")
kbd.type("echo Hello, World!\n")
Both projects focus on USB-based attacks, but usbdriveby offers a broader range of features and targets multiple operating systems. wifi_ducky is more specialized for Wi-Fi-related attacks and has a simpler setup. The code examples show that wifi_ducky uses C++ with the Arduino framework, while usbdriveby utilizes Python with CircuitPython libraries, reflecting their different approaches and target platforms.
P4wnP1 A.L.O.A. by MaMe82 is a framework which turns a Rapsberry Pi Zero W into a flexible, low-cost platform for pentesting, red teaming and physical engagements ... or into "A Little Offensive Appliance".
Pros of P4wnP1_aloa
- More comprehensive and versatile, offering a wide range of attack vectors and functionalities
- Supports multiple USB gadget modes, including HID, RNDIS, ECM, and more
- Provides a web interface for easy configuration and management
Cons of P4wnP1_aloa
- More complex setup and configuration process
- Requires specific hardware (Raspberry Pi Zero W) for full functionality
- Larger codebase and potentially steeper learning curve for beginners
Code Comparison
P4wnP1_aloa (JavaScript):
function startHIDScript(script) {
    return new Promise((resolve, reject) => {
        fetch("/api/hidscript/" + script + "/start", {method: "POST"})
            .then(response => response.json())
            .then(data => resolve(data))
            .catch(error => reject(error));
    });
}
wifi_ducky (Arduino):
void loop() {
  webServer.handleClient();
  if (runLine && !repeatLine) nextLine();
  if (runLine && repeatLine) runScript();
  delay(1);
}
The code snippets demonstrate the different approaches:
- P4wnP1_aloa uses JavaScript for API interactions and script execution
- wifi_ducky employs Arduino code for handling web requests and script execution in a loop
Both projects aim to provide USB rubber ducky functionality, but P4wnP1_aloa offers a more extensive feature set and flexibility, while wifi_ducky focuses on simplicity and ease of use for basic HID attacks.
WiFi HID Injector - An USB Rubberducky / BadUSB On Steroids.
Pros of WHID
- More versatile hardware platform with built-in Wi-Fi capabilities
- Supports multiple payload delivery methods (USB HID, Wi-Fi, Bluetooth)
- Active development and community support
Cons of WHID
- Higher cost due to more advanced hardware
- Steeper learning curve for beginners
- Requires more setup and configuration
Code Comparison
WHID (Arduino-based payload):
#include <Keyboard.h>

void setup() {
  Keyboard.begin();
  delay(1000);
  Keyboard.print("Hello from WHID!");
  Keyboard.end();
}

void loop() {}
WiFi Ducky (Ducky Script payload):
DELAY 1000
STRING Hello from WiFi Ducky!
ENTER
The WHID project uses Arduino-based code for payload delivery, allowing for more complex and customizable scripts. WiFi Ducky relies on the simpler Ducky Script language, which is easier to learn but less flexible.
WHID offers a more powerful and versatile platform for penetration testing and security research, with support for various attack vectors. However, it comes at a higher cost and complexity compared to WiFi Ducky. WiFi Ducky provides a simpler, more accessible solution for basic USB rubber ducky-style attacks, but lacks the advanced features and flexibility of WHID.
P4wnP1 is a highly customizable USB attack platform, based on a low cost Raspberry Pi Zero or Raspberry Pi Zero W.
Pros of P4wnP1
- More comprehensive and versatile tool for penetration testing
- Supports multiple attack vectors (USB, Bluetooth, WiFi, Ethernet)
- Actively maintained with regular updates and a larger community
Cons of P4wnP1
- More complex setup and configuration
- Requires more powerful hardware (Raspberry Pi Zero W)
- Steeper learning curve for beginners
Code Comparison
P4wnP1:
def run():
    # Initialize USB gadget
    usb_gadget.init()
    # Start WiFi access point
    wifi.start_ap()
    # Launch web interface
    web_interface.start()
wifi_ducky:
void setup() {
  // Initialize WiFi
  WiFi.mode(WIFI_STA);
  WiFi.begin(ssid, password);
  // Start USB HID
  DigiKeyboard.sendKeyStroke(0);
}
P4wnP1 offers a more modular and extensible codebase, allowing for easier integration of multiple attack vectors. wifi_ducky, on the other hand, provides a simpler and more focused implementation for WiFi-based keystroke injection.
While P4wnP1 is a more powerful and flexible tool, wifi_ducky excels in its simplicity and ease of use for specific WiFi-based attacks. The choice between the two depends on the user's needs, expertise, and available hardware.
The legacy Exploit Database repository - New repo located at https://gitlab.com/exploit-database/exploitdb
Pros of ExploitDB
- Comprehensive database of exploits for various platforms and software
- Regularly updated with new exploits and vulnerabilities
- Widely used and trusted resource in the cybersecurity community
Cons of ExploitDB
- Larger repository size, potentially requiring more storage space
- May include outdated exploits that are no longer relevant
- Requires more expertise to navigate and utilize effectively
Code Comparison
ExploitDB (Python script example):
#!/usr/bin/python
import sys
import struct
buffer = "A" * 2606 + "\x8f\x35\x4a\x5f" + "\x90" * 16
try:
    file = open("exploit.txt", "wb")
WiFi Ducky (Arduino sketch example):
#include "Keyboard.h"
#include "Mouse.h"
void setup() {
  Keyboard.begin();
  Mouse.begin();
}
Key Differences
- ExploitDB focuses on providing a collection of exploits, while WiFi Ducky is a tool for creating and executing keystroke injection attacks
- ExploitDB is primarily a database, whereas WiFi Ducky is an active attack tool
- ExploitDB requires more technical knowledge to use effectively, while WiFi Ducky is designed for easier use with pre-configured scripts
Convert  designs to code with AI

Introducing Visual Copilot: A new AI model to turn Figma designs to high quality code using your components.
Try Visual CopilotREADME
> â ï¸ Click here for the new Version 'WiFi Duck'
The WiFi Duck (no y) is an entirely new project and uses different connections between the Atmega32u4 and ESP8266.
Wi-Fi Ducky
Upload, save and run keystroke injections remotely with an ESP8266 + ATmega32u4
Support me and my projects on Patreon!

Contents
- Introduction
- Disclaimer
- Installation
- How to use it
- Improvements
- License
- Sources and additional Links
Introduction
What it is
It's a Wi-Fi controlled BadUSB device to remotely execute Ducky Scripts.
Using a USB device which act as a keyboard to inject keystrokes is well known these days. The USB Rubber Ducky by Hak5 is THE hacker gadget for this kind of attack. It introduced a simple script language called Ducky Script, which this project uses too.
How it works
The ESP8266 is a popular Wi-Fi chip used in a lot of projects. Because it's cheap, small and has its own file system (SPIFFS), it's perfect for enabling an easy remote connection and holding Ducky Script payloads.
Although the ESP8266 is awesome, it doesn't have native USB, which means it can't act as a keyboard :(
(cnlohr made a cool project on this and added a USB stack himself: https://github.com/cnlohr/espusb. The problem with that is, that it isn't compatible with the current SDK version, also I wanted to use Arduino to make it more user friendly.)
Here comes the ATmega32u4 into play!
It can act as keyboard and thanks to Seytonic run Ducky Script (link).
So what I did is connecting the ATmega to the ESP8266 via serial.
The ESP will open up a Wi-Fi access point and host a web interface from what you can upload and manage your scripts.
When you hit run, it will send the script to the ATmega, which then will execute it on the target machine.
The benefits of adding Wi-Fi
But why add Wi-Fi ...you might ask.
With Wi-Fi you can upload and run your Ducky Script payloads remotely.
You just need to plug the device in, connect to its Wi-Fi network and you have full control over the target machine.
It also gives you one big advantage over other BadUSBs, you can test your scripts live! You don't need to copy them onto a micro-sd card or compile them. You can run them live over the web interface, which makes its super easy for testing and improving your scripts.
It also adds a lot of possibilities for different attacks.
You could make the target download executables from the Wi-Fi chip, instead of the internet.
Or execute different attacks and send the results back to the Chip. Or open up a reverse shell on the ESP8266s Wi-Fi.
And so on... there are so much possibilities!
Disclaimer
Use it only for testing purposes on your own devices!
I don't take any responsibility for what you do with this project.
Installation
Short version:
Upload the arduino_wifi_duck sketch to your ATmega32u4 and upload the esp8266_wifi_duck sketch to your ESP8266.
Then connect the serial pins (RX and TX (Arduino) to TX and RX (ESP8266)) and GND.
Preparation
What you will need:
- ESP8266 Wi-Fi chip
I recommend using an ESP-12. It's widely used, cheap, tiny and has 4MB of flash memory.
However if you're a beginner you should probably start with a developer board like the NodeMCU or a Wemos d1 mini. - ATmega32u4
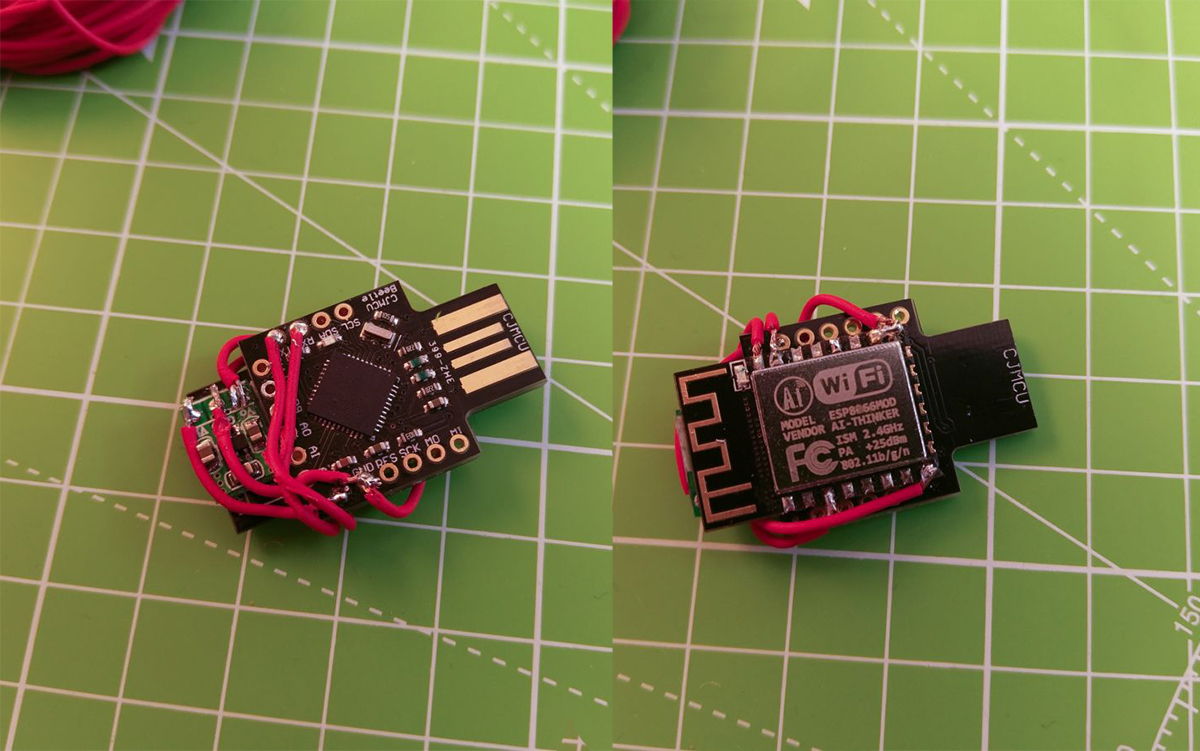
The Arduino Micro and Arduino Leonardo use an ATmega32u4 for example. You could also get a Arduino Pro Micro or other cheap Arduino clones which use the ATmega32u4. I will use an ATmega32u4 CJMCU Beetle. - (a 3.3V regulator)
I put that in brackets because you will only need this if your ATMega32u4 board doesn't provide 3.3V. The ESP8266 only works with 3.3V, so depending on your board you may need a regulator to get 3.3V out of the 5V. - Some skill, knowledge and common sense on this topic
That's probably the most important part here. This project is not noob friendly! If you are a beginner, please start with other projects and get some knowledge about how Arduino and its code works, how to handle errors and how to work with the ESP8266. I can't cover every little detail here. Please respect that. Depending on your hardware choices you may need to add or change a bit of the Arduino code.
So make your hardware choices!
Also I wouldn't go straight forward and solder everything together. Test it beforehand, otherwise debugging can be hard!
For an easy start, better debugging, further development or if you just wanna test this project, I recommend using a Nodemcu + an Arduino Leonardo:
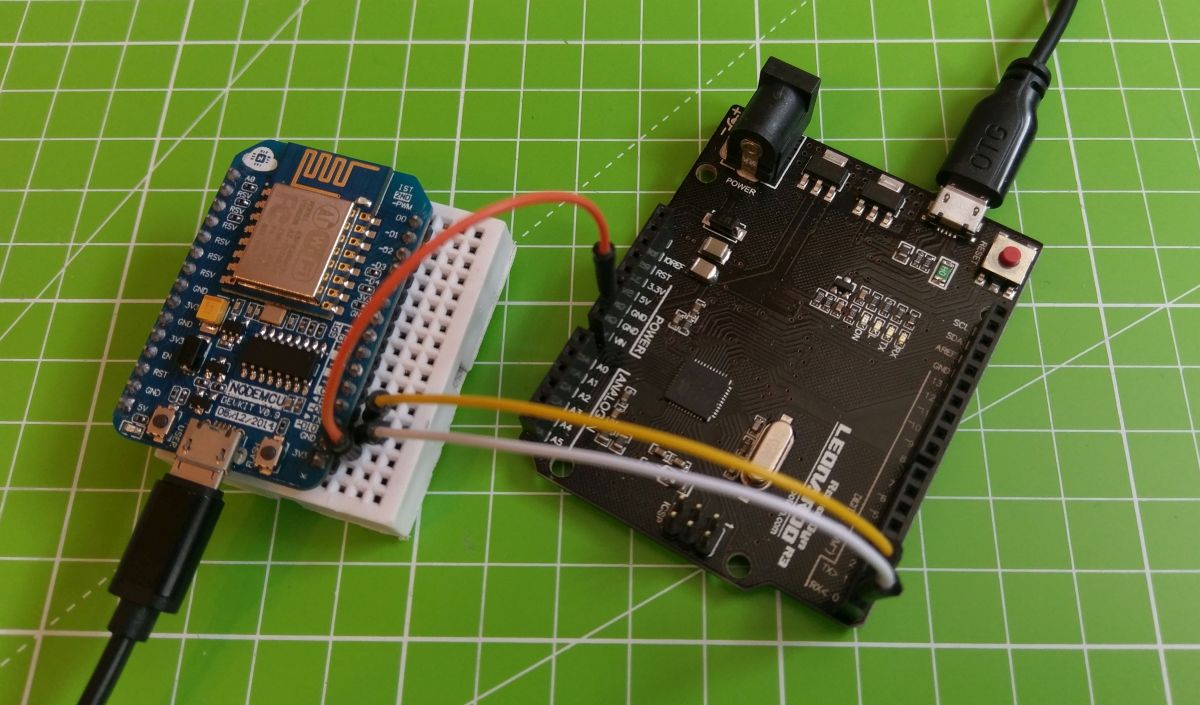 This is easy to setup, you don't need any soldering skills and you can still use both the NodeMCU and the Arduino for other cool projects.
But now let's get started!
ESP8266
First you will need to flash your ESP8266.
You can either flash the bin file directly or compile it yourself using Arduino.
Note: You will only need to flash it once, every new update can then be done over the possibilities.
If don't use a USB dev board and don't know how to flash your plain ESP8266, I recommend you to have a look at this instructable: http://www.instructables.com/id/Getting-Started-with-the-ESP8266-ESP-12/?ALLSTEPS
You could also use your Arduino to flash it: https://gist.github.com/spacehuhn/b2b7d897550bc07b26da8464fa7f4b36 (The connections are the same for this project, the only difference is that you need to set GPIO-0 to LOW to enabling a firmware update).
Flash the .bin File
Go to releases and download the right bin file for your ESP8266.
You can flash it with the esptool or the nodemcu-flasher.
Upload using Arduino
Open the esp8266_wifi_duck sketch with Arduino.
You need to install the following libraries:
Then compile and upload it to your ESP8266 (check if your settings are right).
Arduino ATmega32u4
Open the arduino_wifi_duck sketch in Arduino and upload it to your Arduino.
Wire everything up
Ok so now you need to connect the ESP8266 with the Arduino.
Connect these pins:
| Arduino | ESP82666 |
|---|---|
| TX | RX |
| RX | TX |
| GND | GND |
| VCC (3.3V) | VCC (3.3V) |
Like I mentioned before, you'll need a 3.3V regulator if your Arduino only provides 5V.
Don't connect the ESP8266 to 5V!
If you use a plain ESP-12 like me, you also have to set the enable pin and to HIGH and GPIO15 to LOW:
| PIN | Mode |
|---|---|
| GPIO15 | LOW (GND) |
| CH_PD (EN) | HIGH (3.3V) |
Update ESP8266 over the Web interface
Once you flashed the software, you can update it over the web interface.
Go to 192.168.4.1/update and upload the new .bin file.
(In Arduino go to Sketch->Export compiled Binary to compile your own .bin file)
How to use it
Plug your Wi-Fi Ducky in and connect to the new Wi-Fi network WiFi Duck. The password is quackquack.
Open your browser and go to 192.168.4.1.
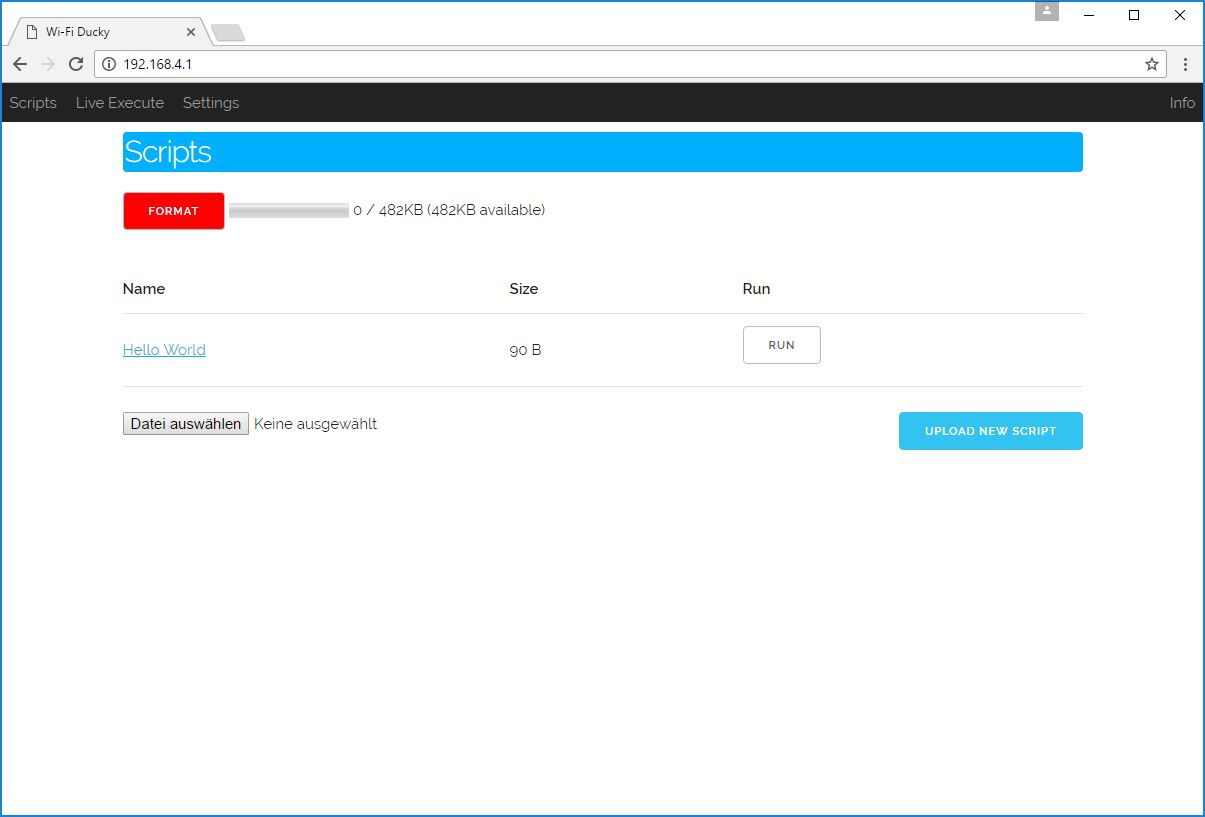
There you can now upload, view, delete and run new Ducky Scripts.
PLEASE NOTE that the max length per row for a script is 600 chars.
How to write Ducky Scripts: https://github.com/hak5darren/USB-Rubber-Ducky/wiki/Duckyscript
Happy hacking :)
Improvements
My wishlist:
- add support for Digispark (ATtiny85) as alternative for the ATmega32u4 Arduino
- change settings within the web interface (Wi-Fi SSID, password etc.)
- full support of all Ducky Script commands (DEFAULTDELAY is missing)
- auto execute scripts
- add mouse
- control over the internet
License
This project is licensed under the MIT License - see the license file file for details
Sources and additional Links
The USB Rubber Ducky: https://hakshop.com/products/usb-rubber-ducky-deluxe
The Malduino (a BadUSB-Arduino/Rubber-Ducky-alternative by Seytonic): https://www.indiegogo.com/projects/malduino-badusb-arduino-usb#/
Seytonic: http://youtube.com/seytonic https://github.com/seytonic
Arduino Ducky Script interpreter: https://github.com/Seytonic/Duckduino-microSD
Cnlohrs ESP8266 USB Software Driver: https://github.com/cnlohr/espusb
Top Related Projects
USBdriveby exploits the trust of USB devices by emulating an HID keyboard and mouse, installing a cross-platform firewall-evading backdoor, and rerouting DNS within seconds of plugging it in.
P4wnP1 A.L.O.A. by MaMe82 is a framework which turns a Rapsberry Pi Zero W into a flexible, low-cost platform for pentesting, red teaming and physical engagements ... or into "A Little Offensive Appliance".
WiFi HID Injector - An USB Rubberducky / BadUSB On Steroids.
P4wnP1 is a highly customizable USB attack platform, based on a low cost Raspberry Pi Zero or Raspberry Pi Zero W.
The legacy Exploit Database repository - New repo located at https://gitlab.com/exploit-database/exploitdb
Convert designs to code with AI
Introducing Visual Copilot: A new AI model to turn Figma designs to high quality code using your components.
Try Visual Copilot